Products for the Kitchen
People often ask me what sorts of equipment we use in our kitchen at home, so I thought I’d write up a brief bit on products for the kitchen. Not only can you stock yourself up with great gear, but you don’t have to spend a ton of money to get a highly functional kitchen.

RING HOLDER
First off I’m going to go behind the scenes a bit and show you my favorite trick for holding my rings while I cook at home. Granted I didn’t do this when we were running our catering kitchen because I didn’t want to leave these laying around, but at home this is the easiest place for me to put them. An old spice jar is the perfect size to hold your rings while you cook. Granted you could just go and pack them away in your jewelry box, but that would mean stopping what you’re doing and going clear across the house to pack them away properly. For me, it’s just easier to keep this small jar with lid on the shelf by the kitchen sink. Since it’s clear I always know where they are, and since it has a lid I never have to worry that they’re going to tip over and go down the drain.
CHEF’S KNIFES
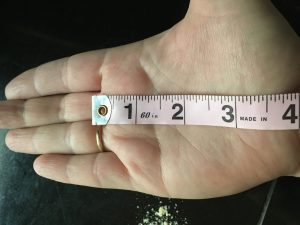
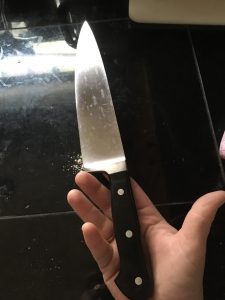
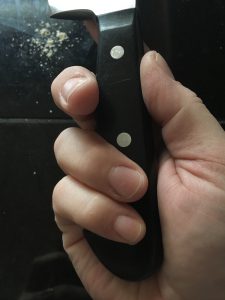
Next I want to share with you how to measure for a chef knife. It’s actually very simple. Open your hand, palm flat. Place a measuring tape on your hand from the base of your fingers and measure down to the butt of the palm. For me this is four inches. Now measure the handle of your chef knife. For the most comfortable fit while you’re holding your knife, you want to make sure the handle is the same length as the palm of your hand. Ideally you’d like the butt of the knife handle to fit into the palm of your hand with just enough length of the handle for your hand to hold the entire handle. Yes, you could purchase a larger knife with longer handle, but in my opinion you lose stability and control when cutting if the knife is too long for your hand. My favorite knife in my kitchen has a six inch blade and a four inch handle. Not only does the length feel perfect in my hand, but the weight is also great. You want a knife that isn’t going to be too light or too heavy. But since this is 1000% personal for each and every one of us, I recommend when you go knife shopping look for a store that sells knives open stock so you can actually hold the knife. You want to get a sense of how it feels in your hand before buying. Nothing is worse for kitchen safety than using a knife that is too big for your hand.
MICROWAVE CLEANER
One of my favorite new kitchen additions is my Angry Mama microwave cleaner. I’m not one of those people that refuses to have a microwave in the house. To me there’s nothing greater than warming up left overs for each person individually in under 3 minutes/plate. Dinner on the table in under 10 minutes for three people? Yes please. Since we use our microwave regularly it used to get super dirty inside. Enter the Angry Mama. You fill her up with a mixture of water and white vinegar (there are measurement markings on her side). Put on the top (her hair) and place it in the microwave for the recommended amount of time. As she heats up the water & vinegar turn to steam, releasing from her head from the holes on top. She steam cleans the microwave for you and all you have to do at the end is wipe it down with a soft cloth or paper towel. If you have stubborn grime, carefully pour some of the hot vinegar/water onto your cloth and scrub. Be careful – it will be VERY HOT.

 PAINTER’S TAPE
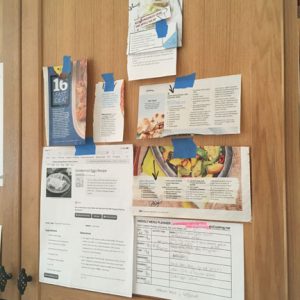
Another of my favorite kitchen tools is blue painter’s tape. Not only do I use it to label left overs in the fridge/freezer, but I use it to tape recipes and my week’s menu plan to the kitchen cabinet. Since its blue tape, it will release without leaving a mark and doesn’t damage the cabinets – SCORE!
CAST IRON PANS
The last thing I’m going to talk about today is how to store cast iron pans. I don’t know about you, but we have a wide selection of pans in various shapes and sizes. After use, clean and dry you pan fully. After drying the pan, you’ll want to season it by taking a piece of paper towel and putting a little vegetable oil on the paper towel. Then gently rub the oil over the entire cooking surface of your pan, don’t forget to go up the sides. Do not leave your pan greasy though. Wipe down the oil once you’ve applied it to the pan. You just want enough oil on there to keep it moist and from rusting out. I have so many pans that I store them nested together in the cabinet. When storing them nested like me, you’ll want to get cushioned pot dividers like the ones I have, or separate each one in the nest with a soft kitchen towel.

I hope you’ve enjoyed this glimpse into my kitchen. I’m always available if you have questions about equipment, products or techniques. Just drop me a line if you have a question or comment. Look forward to hearing from you. And as always happy cooking!
Would you like a FREE COPY of my weekly menu planner? Be sure to sign up for my newsletter HERE to get a copy.
Did you know I have a posted list of recommended cookbooks on my website? Click HERE to visit that page.
You can visit my KITCHEN GADGETS page for recommendations of my must have list of kitchen equipment too.
Have you checked out my Instagram feed yet?